

Wednesday, November 30, 2011


To learn how you can snap pictures and capture videos with your wireless phone visit www.verizonwireless.com/picture.
Note: To play video messages sent to email, QuickTime® 6.5 or higher is required.

To learn how you can snap pictures and capture videos with your wireless phone visit www.verizonwireless.com/picture.
Note: To play video messages sent to email, QuickTime® 6.5 or higher is required.
Tuesday, November 29, 2011


To learn how you can snap pictures and capture videos with your wireless phone visit www.verizonwireless.com/picture.
Note: To play video messages sent to email, QuickTime® 6.5 or higher is required.


This message has been sent using the picture and Video service from Verizon Wireless!
To learn how you can snap pictures and capture videos with your wireless phone visit www.verizonwireless.com/picture.
Note: To play video messages sent to email, Quicktime@ 6.5 or higher is required.
Monday, November 28, 2011


Sunday, November 27, 2011

Saturday, November 26, 2011


This message has been sent using the picture and Video service from Verizon Wireless!
To learn how you can snap pictures and capture videos with your wireless phone visit www.verizonwireless.com/picture.
Note: To play video messages sent to email, Quicktime@ 6.5 or higher is required.
Oh yeah...black Friday Joann door busters on Saturday! Spent $42 and saved $48!!!! Yay!
This message has been sent using the picture and Video service from Verizon Wireless!
To learn how you can snap pictures and capture videos with your wireless phone visit www.verizonwireless.com/picture.
Note: To play video messages sent to email, Quicktime@ 6.5 or higher is required.
Friday, November 25, 2011
Totally Thanksgiving
Our little family had a great Thanksgiving yesterday! It was a little weird to not have my family around for it, but it was still a lot of fun. Most of my family traveled out of town to visit relatives this year, so it was just me, my husband and little Meggie this time. I still made an entire Thanksgiving meal for all of us, so we just have a bunch of leftovers.
I had a great day spending time with Meggie. I'm glad that we did our Thanksgiving craft together. I think that we will do a special craft project for each big holiday. That will be a lot of fun. I'm not sure yet what we will do for Christmas. Maybe we'll make some ornaments together.
I had a great day spending time with Meggie. I'm glad that we did our Thanksgiving craft together. I think that we will do a special craft project for each big holiday. That will be a lot of fun. I'm not sure yet what we will do for Christmas. Maybe we'll make some ornaments together.


Wooden Christmas Tree

Christmas Tree Festival

Turkey Craft Fun

Little Meggie and I made this great paper turkey for Thanksgiving yesterday. She helped me color the feathers and push them onto the back of the turkey with tape. We had a lot of fun. She made sure to give the turkey a hug and kiss. This is a very quick and fun craft to do with your kids!
Thursday, November 24, 2011

Tuesday, November 22, 2011
Thanksgiving Family Fun
I'm looking forward to doing a Thanksgiving craft with my little Meggie. I think I might cut a turkey body out on my Cricut and make feathers for us to color together and glue on. Pictures to follow. :o)
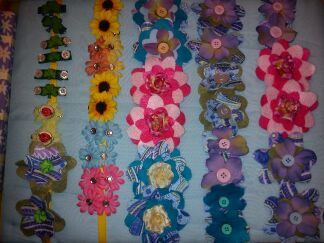
Pretty In Pink

This is my FAVORITE set and I'm keeping it for myself. I love to have magnetic clasps on bracelets! All of my other bracelets are so hard to put on. Maybe I should put magnetic clasps on all of them!!!


Sunday, November 20, 2011

Sitting at a craft show wishing my stuff was selling better. Ohhhh well. Slow day.
This message has been sent using the picture and Video service from Verizon Wireless!
To learn how you can snap pictures and capture videos with your wireless phone visit www.verizonwireless.com/picture.
Note: To play video messages sent to email, Quicktime@ 6.5 or higher is required.
Saturday, November 19, 2011

Friday, November 18, 2011
Dryer Lint Crafts
Some people may be a little weirded out by using drying lint on crafts, but I'm kind of excited about the concept. While researching the idea, I found a number of cool ideas for using dryer lint on craft projects and for home use.
My Favorite Uses For Dryer Lint
Make fire starters - Take an egg carton and fill each egg holder with dryer lint. Cover the lint with broken up crayons. Preheat oven to 175*. Cover cookie sheet with aluminum foil. Put the egg carton on the covered cookie sheet and bake until the crayon wax melts. Remove from the oven and let cool over night. Keep the finished fire starters in a cool dry place. Then you just tear off each egg holder to use as a starter. These are supposed to burn for about five minutes a piece. You can also use old candles instead of broken crayons.
Dryer lint clay - This would be a super fun Christmas tree ornament project. You could roll out the clay and use cookie cutters to cut out Christmas trees.
Dryer lint paper
Fuzzy Fingernails??? - Tap dryer lint on wet fingernails
Fuzzy stripes on cards or scrapbook pages. Take your double sides tape runner and create your tape stripes. Tap the tape with dryer lint and you get fuzzy stripes.
Fuzzy cardstock - cover cardstock with glue and tape with dryer lint. You can then die cut fuzzy letters or shapes
Spin dryer lint into yarn to make craft projects.
People even use dryer lint to make very detailed pictures. I saw a picture of "The Last Supper" made out of dryer lint!!!
One DON'T DO - Don't use dryer lint to stuff items as it is very combustible.
Sleepy Night
Yesterday was a sicky sort of day for me. I felt bad pretty much the whole day. I was really hoping that I'd be able to shake it before the end of the day so I could go and watch the Akron Zips soccer team play their playoff game, but I missed it. I put little Meggie to bed at 7pm and went to bed myself right after that. I didn't get up again til 6:05am today. I feel SO much better today! All of that extra sleep made a HUGE difference! Sometimes you just need to play sleep catch up.
Needless to say, I didn't get any of my craft projects finished last night since I went straight to bed. Tonight will have to be a crafting marathon night. I'm REALLY looking forward to it!!! Hopefully there will be a TON of crafts done by Saturday morning. Obviously, from my previous posts, I have quite a few craft project ideas to choose from. :o)
My mom read my post yesterday about the Cricut Expression that I REALLY want to get. A friend from her work is selling one of hers since she has several and she is going to find out how much she wants for it. I am SO excited!!!!
Thursday, November 17, 2011
Big Dreams
So here's what my big dream hope is for this weekend. I want to make enough money from the craft show in order to buy a Cricut Expression. Right now I have the Cricut Personal Electronic Cutter, which I love. I want to be able to make bigger items though, so I really hope I'll be able to get the Expression soon! Keep your fingers crossed for me!
If I do SUPER DUPER awesome, which I doubt, then I want to get a Gypsy too. :o)
If I do SUPER DUPER awesome, which I doubt, then I want to get a Gypsy too. :o)
List Of Super Awesome Ideas I EVENTUALLY Want To Try
Craft Projects That I Want To Try
Alice in Wonderland themed mini album (to finally use those awesome Alice in Wonderland stamps that I hardly ever get to use)
Celtic mini album (to use the awesome celtic knot stamps that I have NEVER used)
TP roll mini album
Coaster mini album (oooo or add the coasters to a cd mini album to have multiple sizes of circles…how cool would that be!!!)
T-shirt yarn bracelets with hand made flowers
Doll house in a box
Rag doll and dresses for doll house in a box
Shaped mini album made on the cricut
Baby themed mini album (gift)
Wedding themed mini album (Vegas wedding) (gift)
Cake circle mini album
Wood burning project
Used amo art work
Wall art made out of different size circles and hung up on the wall. Mount circles of paper on cake circles. This would be so cute with pictures of the family. Or you could do fabric on the cake circles with quilt batting and ribbon to hold the pictures. This way you could actually change your wall art pictures whenever you wanted.
Bookmarks
Christmas tags
Shabby chic cloth flowers (stock up to use them as add ons to other crafts)
Funky button jewelry
Small sewing kit out of a box
Tag hot chocolate holders
Wine cork box for desk
Wine cork desk cup for pens
Wine cork wreath
Snowman kit (use sculpy clay to make the carrot nose, eyes, and mouth. Make hat and scarf out of fleece)
Button hair clips
Fake flower hair clips
Crocheted flower hair clips
Ribbon bow hair clips
CD case photo boxes to hold craft supplies or cards
Use cd cases to hold clear stamps (mine are starting to get disorganized, so this is a great idea)
I obviously have a TON of cd cases to work with, so I was wondering if you could also make a cool sewing kit gift out of them. You could use flat embroidering thread holders to put the thread on….put some felt in to hold the needs….get a small pair of scissors. I think this would be very doable and cute!
CD case photo frame
CD case desk calendar holder
CD CASE DOLL HOUSE!!!!!!
Wall art that looks like a ball of yarn!!! Take a cake circle, wrap it with the yarn….put in two knitting needs….ta DA!
Busy Night
Well, we had a busy night yesterday, but I didn't get much done on the crafting side. I'm kind of disappointed since I really had a goal to get a lot of items made before the craft show on Sunday. I'd like to have a nice variety for my table. Last night was Ceili Band night though and our family went out to play instruments with the Irish group that we meet with. My daughter brought her toy fiddle for the first time and wowed all of our friends with her mad skills. :o) I did manage to start work on some toddler hair clips that I'm making to sell before we left for the evening. Hopefully I'll be able to get those finished before the weekend.
Wednesday, November 16, 2011
Great Ideas
I go to my "day job" and can't stop thinking about all of the crafts that I want to work on after I put my daughter to bed. Ultimately, if I start working on something with her around she wants to "help" mommy get it done or is upset that she is not getting 100% of my attention. It's cute when I am crocheting because she really wants to do it too. This can be hazardous to my yarn collection if she gets ahold of it. Her grandma has sat down and rewound MANY yarn balls for me after Meghan the Meghamonster gets ahold of them. She loves to wind them all around the house and around the furniture legs. I'm not quite sure how this is pretending to crochet like mommy, but she has fun. I suppose the mess is my fault as I just let her have fun with it. I'm happy that she is so excited about crafts. Over the years craft projects and art have meant a lot to me, so I hope that my daughter gets as much pleasure out of craft projects as I do.
Let's get back to the ideas that keep swimming around in my head. I think I'm going to make a craft idea journal of all of the projects that I want to eventually make. It would be fun to go back and ad pictures of the ones that actually come to fruition.. Lately I've just been sending e-mails to myself at home when I come up with a great idea of something that I want to try. For example, I was thinking about all of the gift bags that I saved from my baby shower more than two years ago. What in the world could I do with all of those bags? I'm never going to use them all for shower gifts, but they are so cute that I don't want to throw them away. I decided that they would make a great mini album for my sister in law's second baby. I know they're not acid free or anything, but they'll still be fun to use! :o)
Let's get back to the ideas that keep swimming around in my head. I think I'm going to make a craft idea journal of all of the projects that I want to eventually make. It would be fun to go back and ad pictures of the ones that actually come to fruition.. Lately I've just been sending e-mails to myself at home when I come up with a great idea of something that I want to try. For example, I was thinking about all of the gift bags that I saved from my baby shower more than two years ago. What in the world could I do with all of those bags? I'm never going to use them all for shower gifts, but they are so cute that I don't want to throw them away. I decided that they would make a great mini album for my sister in law's second baby. I know they're not acid free or anything, but they'll still be fun to use! :o)
Fun Craft Night
I had such a fun craft night yesterday! I got so much done that I was really proud of what I accomplished. I got my chip board in the mail yesterday to do my mini scrapbook album with, so I made a square one that I haven't taken pictures of yet. I also started to work on another mini cd album. I have a TON of empty cd cases that I plan on making mini albums out of as well. I just need to plan out exactly how I want to do those.
I made three sets of felt little girl hair clips for Christmas that I also haven't taken pictures of yet. I made the hair clip holders (pictures below) which got done SUPER fast. If you want to make these they are SO easy to do. I got wooden boards at Joanns that you might use for wood burning projects (another craft that I haven't started to work on yet). You just cut a piece of quilt batting the size of the front of the board. Staple the four corners of the batting down to the board. Cut a piece of fabric at least three inches bigger than the board all the way around so you can wrap the fabric to the bottom completely covering the sides. Staple one side of the fabric on the back. Staple the opposite side of the fabric, tugging it snug before you staple. Fold the opposite sides like a Christmas gift and pull them up snug. Staple the center area and tug up at the corners and staple the corners. Staple the rest of these sides. Choose ribbon that is not really slick so the hair bows won't slip all over the place. You can test this by taking hair bows and clipping to the ribbon to see if they move around a lot. Once it is against the batting it will move around less anyway, so this is just a general precaution. Measure out however many strips of ribbon you want on your board and staple them onto the back just like we did the fabric, tugging to make sure they are snug. Make sure not to put your ribbons too close together or your hair clips will be too close together when you put them on and may not fit. If you plan on hanging this on the wall staple another piece of ribbon on the back for the wall hanging section (pictured below in the photo without any hair clips on it). To give the back a more finished look you can take a piece of similarly colored card stock and staple it over everything on the back, like the back of many picture frames you see. This would be a great Christmas gift for a girl! You can also do these projects to hold photos for your desk. I plan on making one of these for my desk sometime in the future.
I made three sets of felt little girl hair clips for Christmas that I also haven't taken pictures of yet. I made the hair clip holders (pictures below) which got done SUPER fast. If you want to make these they are SO easy to do. I got wooden boards at Joanns that you might use for wood burning projects (another craft that I haven't started to work on yet). You just cut a piece of quilt batting the size of the front of the board. Staple the four corners of the batting down to the board. Cut a piece of fabric at least three inches bigger than the board all the way around so you can wrap the fabric to the bottom completely covering the sides. Staple one side of the fabric on the back. Staple the opposite side of the fabric, tugging it snug before you staple. Fold the opposite sides like a Christmas gift and pull them up snug. Staple the center area and tug up at the corners and staple the corners. Staple the rest of these sides. Choose ribbon that is not really slick so the hair bows won't slip all over the place. You can test this by taking hair bows and clipping to the ribbon to see if they move around a lot. Once it is against the batting it will move around less anyway, so this is just a general precaution. Measure out however many strips of ribbon you want on your board and staple them onto the back just like we did the fabric, tugging to make sure they are snug. Make sure not to put your ribbons too close together or your hair clips will be too close together when you put them on and may not fit. If you plan on hanging this on the wall staple another piece of ribbon on the back for the wall hanging section (pictured below in the photo without any hair clips on it). To give the back a more finished look you can take a piece of similarly colored card stock and staple it over everything on the back, like the back of many picture frames you see. This would be a great Christmas gift for a girl! You can also do these projects to hold photos for your desk. I plan on making one of these for my desk sometime in the future.


I've still been working on items for the craft show this weekend. I made this great little girl hair clip holder. These are so easy to make. I thought that this would be great to hold the hair bows that I'm selling so no one will "accidentally" walk off with them. I also made a wall hanging version to sell at the craft show. (pictured below)
To learn how you can snap pictures and capture videos with your wireless phone visit www.verizonwireless.com/picture.
Note: To play video messages sent to email, QuickTime® 6.5 or higher is required.

Monday, November 14, 2011
My Pink Stamper
I made the cd mini album as a challenge for the My Pink Stamper blog hop this week. I'm so happy with how it turned out. Check out all of the pictures listed below. There are a number of secret pockets and pull outs. I am so excited about making recycled crafts!
Go to http://www.mypinkstamper.com/ if you want to participate.
I'm planning on making some Christmas cards for the troups soon. Check out http://www.spottedcanary.com/ if you want information on this and some great tutorials on card making.
Go to http://www.mypinkstamper.com/ if you want to participate.
I'm planning on making some Christmas cards for the troups soon. Check out http://www.spottedcanary.com/ if you want information on this and some great tutorials on card making.


Busy Crafting Weekend
Well I had a pretty busy crafting weekend. I got a lot of projects started, but didn't have time to complete everything. I also came up with some great ideas for new projects.
I worked on the wrist pin cushions. I didn't have any kind of pattern, so it took me awhile to get into a groove of how I wanted to make them. Some of them I'm not really happy with, but overall I think I came up with a good plan on how I want to make them in the future. I plan on doing a number of them for Christmas gifts as I love the idea of having a pin cushion so handy during sewing projects. I always put the pins in my mouth and inevitably end up poking my tongue. This will probably be much safer as long as I don't ram a pin into my arm instead of my wrist.
I was so excited about the t-shirt yarn project. I spent the time to tie die the old t-shirts first so I would end up with a great variegated yarn. I used red and yellow tie die, which turned out pink and light yellow since I got impatient and didn't let them sit the whole 8 hours to set. I actually like the pink better than deep red anyway, so we'll say I did this on purpose. I started making an awesome crocheted bowl out of the t-shirt yarn that I plan on using at my desk at work. It will be great to keep paper scraps in.....or it MAY end up being a fake flower vase. It just depends on where my inspiration goes as I crochet. I don't follow a pattern for crocheting, I just sort of make it up as I go and see what it turns into as different things inspire me.
The multiple decoupage projects that I worked on took up a lot more time than I thought they would. The chest that I am doing is around a foot wide, so it's not really small. It definitely took a long time to cover it all. The little decoupage baby box will eventually turn into a cute accordion mini album that I will take pictures of. I have a number of great mini album ideas that I plan to work on in the future.
So that was my busy weekend in crafting. There is much more to come as I prepare for the craft show this coming Sunday.
Decoupauge Chest

What a fun project! But it is definitely going to take me awhile to get it exactly the way that I want it.
My First Ball Of T-shirt Yarn

This was such a fun project. I tie died several t-shirts first so I would end up with varigated t-shirt yarn when I was done. I'm working on making something with it, but it will be a little while before it's done. There are a number of things that you can make out of this. Check out spottedcanary.com to find an awesome class that they have on things you can make out of old t-shirts. It's so fun to make upcycled crafts!

Saturday, November 12, 2011

Friday, November 11, 2011
Christmas Album Fun
For the mini Christmas album I started with 8 1/2" x 11" thicker brown cardstock from Joanns. It's not chipboard but is thicker than regular cardstock. I folded the sheets in half 5 1/2" x 11 inch now. I made each paper square 5 1/2" x 5 1/2" by cutting them down with a scrapbooking cutting tool. I used 3 sheets of paper on this project, but you could use more.
I opened up the pages to the center after stacking them all together and stitched them on my sewing maching down the crease in order to bind them all together. This is a great method to keep the book together and is very fast. I cut out all of my base pages that I planned on using first. This saved me from having to constantly get my cutting tool out. I used a new Christmas paper stack that I got from Joanns this month. The sheets were cut at about 5" x 5". I used my ATG gun to adhear them all. You can decorate them however you want, but view the different pictures that I posted to get some ideas.
Materials
*stiff light brown cardstock
*Christmas scrapbook paper
*Buttons and flowers
*Tape Runner
*Sewing Machine
*Zots glue dots to adhear flowers and buttons
*String
*Scrapbooking supplies such as scissors, long cutters, and paper folders
(you can use a number of other elements to decorate with)
It's fun to make hidden pockets, just make sure to cut the insert paper smaller than the pocket so it will fit without touching your glue tape.
Thursday, November 10, 2011


Subscribe to:
Posts (Atom)